반응형

https://overthewire.org/wargames/bandit/bandit5.html


OverTheWire: Level Goal

We're hackers, and we are good-looking. We are the 1%. <!-- Please read and accept the Rules! --> Level Goal The password for the next level is stored in the only human-readable file in the inhere directory. Tip: if your terminal is messed up, try the “r

overthewire.org


Bandit Level 4 → Level 5


Level Goal
The password for the next level is stored in the only human-readable file in the inhere directory. Tip: if your terminal is messed up, try the “reset” command.

Commands you may need to solve this level
ls , cd , cat , file , du , find


ls : 현재 내 위치에 존재하는 데이터를 보여줌

cd : Change Directory, 말 그대로 디렉토리 경로를 이동

cat : 파일이나 데이터의 내용을 출력

du : 디스크나 용량 확인

find : 리눅스 파일 시스템에서 파일을 검색하는데 사용되는 명령어


레퍼런스

https://coding-factory.tistory.com/804


[Linux] 리눅스 find 명령어 사용법 (파일 찾기, 검색)

find 명령어 리눅스의 find 명령어는 리눅스 파일 시스템에서 파일을 검색하는 데 사용되는 명령어입니다. 다양한 표현식을 사용하여 원하는 파일의 목록을 추출할 수 있습니다. 리눅스 find 사용

coding-factory.tistory.com


문제 해석

패스워드는 inhere directory안에 오직 인간만이 읽을 수 있는 파일에 있다. 화면이 좀 지저분하면, reset을 추천한다. 


bandit4@bandit:~$ ls
inhere
bandit4@bandit:~$ file inhere
inhere: directory
bandit4@bandit:~$ cd inhere
bandit4@bandit:~/inhere$ ^C
bandit4@bandit:~/inhere$ ls
-file00  -file01  -file02  -file03  -file04  -file05  -file06  -file07  -file08  -file09

우선 inhere directory로 경로를 이동한다.

그리고, inhere idrectory에 -file00 ~ file09까지의 여러 파일이 있다


자, 여기서 "나는 저 파일을 다 확인하면 되겠는데?"라고 생각하는 분이 있다면, 한 손을 들어올려 자신의 뺨을 쳐주세ㅇ...

본인 이야기다.


우리는 해커가 될 거니까, 좀 더 인텔리한 방법을 찾아보자


bandit4@bandit:~/inhere$ file -file00
file: Cannot open `ile00' (No such file or directory)

문제에서 the only human-readable file라는 문구가 있어서 file 명령어로 파일의 형태를 알아본다.

그러나, -file00은 -가 선두에 오는데, 이 경우에는 상대경로를 활용하여 확인할 수 있다


bandit4@bandit:~/inhere$ file ./-file00
./-file00: data
bandit4@bandit:~/inhere$ file ./-file01
./-file01: data
bandit4@bandit:~/inhere$ file ./-file02
./-file02: data

이렇게 -file00 부터 -file09까지 확인할 수 있지만, 우리는 해커다.

조금 더 편하게 보기 위해 와일드카드를 활용하자


bandit4@bandit:~/inhere$ file ./*
./-file00: data
./-file01: data
./-file02: data
./-file03: data
./-file04: data
./-file05: data
./-file06: data
./-file07: ASCII text
./-file08: data
./-file09: data

-file07은 파일 형태가 ASCII text로 되어있다. 즉, the only-human readable file에 적합한 상태이다.

이제 -file07을 cat 명령어로 출력해보자


bandit4@bandit:~/inhere$ cat ./-file07
4oQYVPkxZOOEOO5pTW81FB8j8lxXGUQw

So easy하게 풀리는 문제다


정리

1. the only-human readable file단서가 file 명령어로 확인할 수 있다는 것을 추론한다

2. -로 시작된 파일은 상대경로로 접근하면 확인할 수 있다

반응형

'네트워크 공부 > bandit' 카테고리의 다른 글

[Bandit] Level 6 -> Level 7  (0) 2024.07.19
[Bandit] Level 5 -> Level 6  (0) 2024.07.19
[Bandit] Level 3 -> Level 4  (0) 2024.07.18
[Bandit] Level 2 -> Level 3  (0) 2024.07.18
[Bandit] Level 1 -> Level 2  (0) 2024.07.18
반응형

https://overthewire.org/wargames/bandit/bandit4.html


OverTheWire: Level Goal

We're hackers, and we are good-looking. We are the 1%. <!-- Please read and accept the Rules! --> Level Goal The password for the next level is stored in a hidden file in the inhere directory. Commands you may need to solve this level ls , cd , cat , file

overthewire.org


Bandit Level 3 → Level 4


Level Goal
The password for the next level is stored in a hidden file in the inhere directory.

Commands you may need to solve this level
ls , cd , cat , file , du , find


문제 해석

inhere directory의 숨겨진에 패스워드가 있다.


ls 명령어를 사용하여 inhere 디렉토리를 확인하자.

그리고 cd (Change Directory) 명령어를 사용하여 inhere directory에 접근한다.


cd : Change Directory.
cd .. : 이전에 있던 디렉토리로 이동
cd / : 최상위 디렉토리로 이동
cd ~ : 홈 디렉토리로 이동
bandit3@bandit:~$ ls
inhere
bandit3@bandit:~$ cd inhere
bandit3@bandit:~/inhere$ ls
bandit3@bandit:~/inhere$

분명 /inhere 디렉토리에서 ls를 했는데 아무것도 존재하지 않는다.

ls 명령어의 전달인자에 -al을 사용한다면, 숨겨진 폴더나 파일의 정보를 볼 수 있다.


bandit3@bandit:~/inhere$ ls -al
total 12
drwxr-xr-x 2 root    root    4096 Jul 17 15:57 .
drwxr-xr-x 3 root    root    4096 Jul 17 15:57 ..
-rw-r----- 1 bandit4 bandit3   33 Jul 17 15:57 ...Hiding-From-You

이제 cat 명령어를 사용해서 해당 파일을 출력하자.


bandit3@bandit:~/inhere$ cat ...Hiding-From-You
2WmrDFRmJIq3IPxneAaMGhap0pFhF3NJ

참고로, ...까지 치고 tab을 누르면 자동완성 된다.


정리

1. 숨겨진 디렉토리나 파일 정보를 보려면 ls -al

반응형

'네트워크 공부 > bandit' 카테고리의 다른 글

[Bandit] Level 5 -> Level 6  (0) 2024.07.19
[Bandit] Level 4 -> Level 5  (0) 2024.07.19
[Bandit] Level 2 -> Level 3  (0) 2024.07.18
[Bandit] Level 1 -> Level 2  (0) 2024.07.18
[Bandit] Level 0 -> Level 1  (0) 2024.07.18
반응형


https://overthewire.org/wargames/bandit/bandit3.html


OverTheWire: Level Goal

We're hackers, and we are good-looking. We are the 1%. <!-- Please read and accept the Rules! --> Level Goal The password for the next level is stored in a file called spaces in this filename located in the home directory Commands you may need to solve thi

overthewire.org


Bandit Level 2 → Level 3


Level Goal
The password for the next level is stored in a file called spaces in this filename located in the home directory

Commands you may need to solve this level
ls , cd , cat , file , du , find

Helpful Reading Material
Google Search for “spaces in filename”


문제 해석

home directory 안에 spaces in this filename라는 파일에 패스워드가 있다.


일단 pwd, ls 명령어로 home directory의 spaces in this file name이라는 파일 존재를 확인하자.

bandit2@bandit:~$ pwd
/home/bandit2
bandit2@bandit:~$ ls
spaces in this filename

자, 그럼 여태껏 그래왔듯이 cat 명령어를 사용하여 파일을 출력하자


bandit2@bandit:~$ cat spaces in this filename
cat: spaces: No such file or directory
cat: in: No such file or directory
cat: this: No such file or directory
cat: filename: No such file or directory

파일에 공백이 있으면, 명령어에 파일명을 입력할 때 파일명이 명령어의 전달 인자로서 인식할 수 있다.

그래서 왠만하면 공백을 피하는 게 좋은데, 공백이 씌여진 파일은 큰 따옴표나 tab으로서 읽을 수 있다.


bandit2@bandit:~$ cat spaces\ in\ this\ filename
MNk8KNH3Usiio41PRUEoDFPqfxLPlSmx

tab을 누른 경우
bandit2@bandit:~$ cat "spaces in this filename"
MNk8KNH3Usiio41PRUEoDFPqfxLPlSmx

큰 따옴표를 사용하여 출력한 경우


정리

1. 큰 따옴표나 tab을 사용하여 공백이 있는 파일을 출력하자

반응형

'네트워크 공부 > bandit' 카테고리의 다른 글

[Bandit] Level 4 -> Level 5  (0) 2024.07.19
[Bandit] Level 3 -> Level 4  (0) 2024.07.18
[Bandit] Level 1 -> Level 2  (0) 2024.07.18
[Bandit] Level 0 -> Level 1  (0) 2024.07.18
[Bandit] Bandit Level 0 putty로 시작하기  (0) 2024.07.18
반응형

https://overthewire.org/wargames/bandit/bandit2.html


OverTheWire: Level Goal

We're hackers, and we are good-looking. We are the 1%. <!-- Please read and accept the Rules! --> Level Goal The password for the next level is stored in a file called - located in the home directory Commands you may need to solve this level ls , cd , cat

overthewire.org


Bandit Level 1 → Level 2


Level Goal

The password for the next level is stored in a file called - located in the home directory

Commands you may need to solve this level
ls , cd , cat , file , du , find


문제 해석

다음 레벨로 가는 패스워드는 home 디렉토리의 - 파일에 있다.


현재 위치를 확인하는 pwd 명령어와 현채 디렉토리에 존재하는 것들을 보여주는 ls를 사용해보자.

bandit1@bandit:~$ pwd
/home/bandit1
bandit1@bandit:~$ ls -l
total 4
-rw-r----- 1 bandit2 bandit1 33 Jul 17 15:57 -

ls -l : [파일 형태] [권한] [하드 링크 수] [소유자] [그룹] [파일 크기] [시간] [파일 이름]


-rw-r----- 1 bandit2 bandit1 33 Jul 17 15:57 -

부분에서 15:57 오른쪽에 - 가 파일 명이다.

사실, ls에서 -l 옵션을 제외하고 보면 더 편하다

bandit1@bandit:~$ ls
-

- 파일이 있는 것을 확인했으니, cat 을 이용하여 출력하자.


bandit1@bandit:~$ cat -

그러나 아무 반응이 없다.


- 파일이 어떤 종류인지 알고 싶은데, 이때 file 명령어를 사용하면 된다.

file [파일명]
bandit1@bandit:~$ file -

이번에도 아무 반응이 없다....

이때는 상대경로를 사용하여 -파일에 접근해보자


bandit1@bandit:~$ file ./-
./-: ASCII text

 ASCII text라는 형태로, 출력하면 충분히 읽을 수 있는 형태이다.

꿹꿝?*꿟 처럼 나오지 않으니까..!


여기서, 파일을 출력하는 cat에 상대경로를 사용하여 다시 출력해보자


bandit1@bandit:~$ cat ./-
263JGJPfgU6LtdEvgfWU1XP5yac29mFx

이렇게 Level 1 -> Level 2 로 가는 패스워드를 찾았다.


정리

1. 절대경로가 안된다면 상대경로로

반응형

'네트워크 공부 > bandit' 카테고리의 다른 글

[Bandit] Level 4 -> Level 5  (0) 2024.07.19
[Bandit] Level 3 -> Level 4  (0) 2024.07.18
[Bandit] Level 2 -> Level 3  (0) 2024.07.18
[Bandit] Level 0 -> Level 1  (0) 2024.07.18
[Bandit] Bandit Level 0 putty로 시작하기  (0) 2024.07.18
반응형
https://overthewire.org/wargames/bandit/bandit1.html
 

OverTheWire: Level Goal

We're hackers, and we are good-looking. We are the 1%. <!-- Please read and accept the Rules! --> Level Goal The password for the next level is stored in a file called readme located in the home directory. Use this password to log into bandit1 using SSH. W

overthewire.org


Bandit Level 0 → Level 1


Level Goal


The password for the next level is stored in a file called readme located in the home directory. Use this password to log into bandit1 using SSH. Whenever you find a password for a level, use SSH (on port 2220) to log into that level and continue the game.

Commands you may need to solve this level
ls , cd , cat , file , du , find


문제 해석


Level 0 -> Level 1로 가기 위한 비밀번호는 readme라는 홈 디렉토리안에 있다. SSH 통신을 활용하여 비밀번호를 찾아보자.


home 디렉토리 안에 readme 파일이 있으니, home 디렉토리로 이동해보자.


우선, pwd를 이용하여 내가 어느 위치에 있는지 확인해보자.

pwd : 현재 자신의 위치를 나타냄
bandit0@bandit:~$ pwd
/home/bandit0


/home/bandit0 를 통해, 현재 위치가 home 디렉토리라는 것을 확인했다.


ls 명령어를 이용하여, 현재 디렉토리에 어떤 파일, 폴더가 있는 출력해보자

ls : 현재 디렉토리에 있는 파일, 폴더 출력
ls -l : [파일 형태] [권한] [하드 링크 수] [소유자] [그룹] [파일 크기] [시간] [파일 이름]
bandit0@bandit:~$ ls -l
total 4
-rw-r----- 1 bandit1 bandit0 437 Jul 17 15:57 readme

-rw-r-----에서 가장 첫 번째 문자가 d이면 directory, -이면 일반 파일


이로써, 현재 home 디렉토리에 readme 파일이 있는 것을 확인할 수 있다.


cat 명령어를 사용하여 readme 파일 내용을 출력하자

cat : 해당 파일의 내용을 출력, 또는 입력할 수 있음
bandit0@bandit:~$ cat readme
Congratulations on your first steps into the bandit game!!
Please make sure you have read the rules at https://overthewire.org/rules/
If you are following a course, workshop, walthrough or other educational activity,
please inform the instructor about the rules as well and encourage them to
contribute to the OverTheWire community so we can keep these games free!

The password you are looking for is: ZjLjTmM6FvvyRnrb2rfNWOZOTa6ip5If


이로서, Level 0에서 Level 1로 가는 ZjLjTmM6FvvyRnrb2rfNWOZOTa6ip5If 비밀번호를 획득했다.


참고로, bandit 비밀번호는 따로 메모장에 저장해두는 게 좋다! 

Level0 -> Level1

Level1 -> Level2

당연한 이야기지만, 각 레벨마다 비밀번호가 다르기 때문..!


정리 

1. pwd를 사용하여 현재 위치 확인

2. ls -l로 현재 위치의 디렉토리나 파일 확인

3. cat으로 readme 파일의 내용 출력


잡지식 Time


Putty 텍스트 복사 -> windows 텍스트 붙여넣기

- Putty에서 드래그 후 Ctrl + c, 윈도우에서 Ctrl + v


Windows 텍스트 복사 -> Putty 텍스트 붙여넣기

- 윈도우에서 Ctrl + c 후 Putty에서 Shift + Inesrt


Putty에서 clear 명령어 혹은 ctrl + l (i 아니고 L 이다) 하면 화면 깨끗해짐


반응형

'네트워크 공부 > bandit' 카테고리의 다른 글

[Bandit] Level 4 -> Level 5  (0) 2024.07.19
[Bandit] Level 3 -> Level 4  (0) 2024.07.18
[Bandit] Level 2 -> Level 3  (0) 2024.07.18
[Bandit] Level 1 -> Level 2  (0) 2024.07.18
[Bandit] Bandit Level 0 putty로 시작하기  (0) 2024.07.18
반응형

https://overthewire.org/wargames/bandit/bandit0.html


OverTheWire: Level Goal

We're hackers, and we are good-looking. We are the 1%. <!-- Please read and accept the Rules! --> Level Goal The goal of this level is for you to log into the game using SSH. The host to which you need to connect is bandit.labs.overthewire.org, on port 222

overthewire.org


우선, 아래 링크를 통하여 Putty를 다운로드한다.

https://www.putty.org/


Download PuTTY - a free SSH and telnet client for Windows

Is Bitvise affiliated with PuTTY? Bitvise is not affiliated with PuTTY. We develop our SSH Server for Windows, which is compatible with PuTTY. Many PuTTY users are therefore our users as well. From time to time, they need to find the PuTTY download link. W

www.putty.org


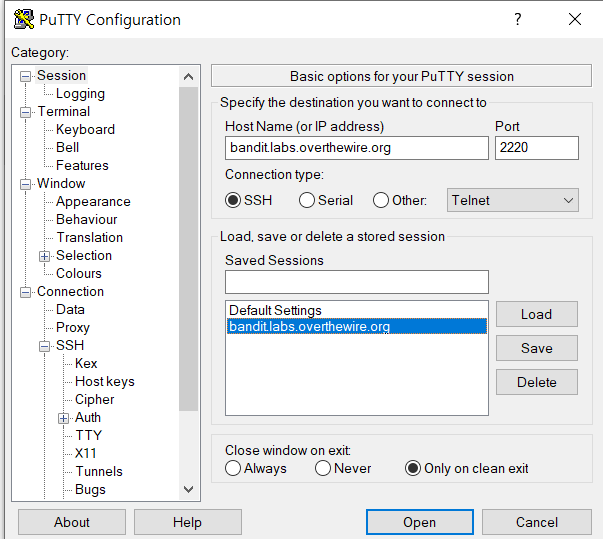
putty에서 Host Name과 Port 설정


Lines of scrollback 수(스크롤 라인 수 증가) 증가시키기기


300초 마다 패킷을 보내서 세션 유지


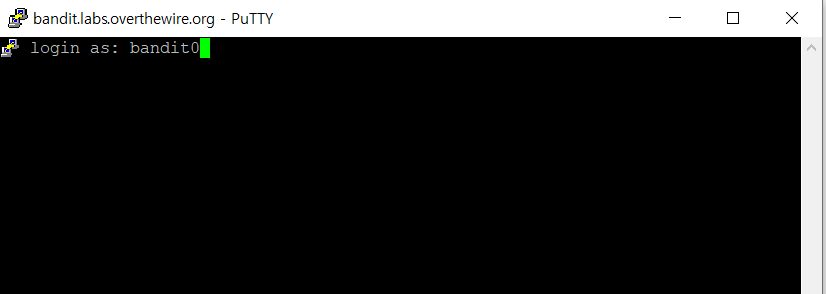
이제 Putty로 bandit Level 0에 접속해보자

login as : bandit0
비밀번호도 bandit0


접속완료


bandit0 권한에 들어왔다면, 이제 Level1로 올라가보자

반응형

'네트워크 공부 > bandit' 카테고리의 다른 글

[Bandit] Level 4 -> Level 5  (0) 2024.07.19
[Bandit] Level 3 -> Level 4  (0) 2024.07.18
[Bandit] Level 2 -> Level 3  (0) 2024.07.18
[Bandit] Level 1 -> Level 2  (0) 2024.07.18
[Bandit] Level 0 -> Level 1  (0) 2024.07.18
반응형

Virtualbox Kali Linux에서 Snort 설치하기


정보보안기사를 공부하다가 알게된 Snort.. 오픈소스 IDS로, 네트워크 보안을 실습하는데 큰 도움이 될 것 같아서 사용해보려고 한다. 더불어, xx기업 보안관제 기술면접을 볼 때도, "snort 사용하신 적 있어요?"라고 물을 정도였으니, 간단하게라도 해보면 좋을 것 같다.


(저는 아래 레퍼런스를 참고했고, root 계정으로 진행했습니다)


https://greensul.tistory.com/280


[Kali Linux] Kali(Debian)에 Snort 설치 방법

Snort 설치 및 구동 방법 - Kali Linux (Debian) 제가 운영 중인 Kali Linux(Debian) VM에 snort 테스트를 하기 위해 snort 설치를 진행하였습니다. Snort는 Network 보안에서 IPS, IDS의 중요한 부분을 차지하고 있습니

greensul.tistory.com


0. root계정으로 접근합니다.

sudo su (초기 비밀번호 kali)


1. apt-get 패키지 다운로드 서버를 변경하기 위해 source.list 파일을 백업합니다.

mv /etc/apt/sources.list /etc/apt/sources.list.bak


2. 설치된 kali 업데이트를 제거합니다.

find /var/lib/apt/lists -type f -exec rm {} \;


3. sources.list에 update source.list를 추가하고

vi /etc/apt/sources.list

아래 리스트를 복붙합니다.

(vi 모드에서 복붙하려면 마우스 우클릭 복사 -> 우클릭 붙여넣기 -> esc -> :wq)

deb http://archive.ubuntu.com/ubuntu/ focal main restricted universe multiverse
deb-src http://archive.ubuntu.com/ubuntu/ focal main restricted universe multiverse
deb http://archive.ubuntu.com/ubuntu/ focal-updates main restricted universe multiverse
deb-src http://archive.ubuntu.com/ubuntu/ focal-updates main restricted universe multiverse
deb http://archive.ubuntu.com/ubuntu/ focal-security main restricted universe multiverse
deb-src http://archive.ubuntu.com/ubuntu/ focal-security main restricted universe multiverse
deb http://archive.ubuntu.com/ubuntu/ focal-backports main restricted universe multiverse
deb-src http://archive.ubuntu.com/ubuntu/ focal-backports main restricted universe multiverse
deb http://archive.canonical.com/ubuntu focal partner
deb-src http://archive.canonical.com/ubuntu focal partner


4. apt update를 진행합니다

apt update


apt update 시 에러 발생한 화면


4-1. specified public key 추가

GPG 에러가 발생한다면, 에러 메세지의 Key값인 공개키를 등록해야 한다.

The following signatures couldn't be verified because the public key is not available: NO_PUBKEY 3B4FE6ACC~~~ NO_PUBKEY 87192~~~

에러 메세지의 뒷부분(NO_PUBKEY 값을 두 가지 확인하여, 아래와 같이 각각 등록한다)

sudo apt-key adv --keyserver keyserver.ubuntu.com --recv-keys 3B4FE6A~~~~

sudo apt-key adv --keyserver keyserver.ubuntu.com --recv-keys 87192~~

공개키 등록

4-2. apt update를 진행한다

apt update

apt update 진행되는 중...


5. snort를 설치한다

apt install -y snort

snort 설치 중..

5-1. Web UI로 제공되는 pcap 파일 분석을 위한 웹 서비스가 있습니다. 이를 추가로 설치합니다.

https://github.com/shendo/websnort


GitHub - shendo/websnort: Web service for scanning pcaps with snort

Web service for scanning pcaps with snort. Contribute to shendo/websnort development by creating an account on GitHub.

github.com


websnort를 설치하기 위해 명령어 입력

service snort stop

update-rc.d snort disable

chmod a+r /etc/snort/snort.conf

pip install websnort


(chmod a+r의 의미는, 해당 conf에 a 모든 사용자가 + r 읽기 권한을 주는 것)

pip install websnort

6. Web snort 실행 후 확인

websnort

websnort

websnort를 실행하면 8080포트를 사용하고, Listening 상태라는 것을 확인할 수 있다. virtualbox에서 127.0.0.1:8080에 접속하여 아래와 같은 화면이 뜨면 성공적으로 설치를 완료한 것이다.

http://127.0.0.1:8080


7. snort 실행하기 위해, 우선 인터페이스를 수정합니다.

ifconfig를 사용하여 자신의 인터페이스가 어떤 이더넷을 사용하는지 확인합니다. 저는 eth0을 사용합니다. 

ifconfig

snort -i eth0 -A console -c /etc/snort/snort.conf


해당 명령어를 실행하면 snort가 구동되는데, ctrl + c 나 ctrl + z로 종료 후 재실행이 필요합니다.


8. 마지막으로, 백업해두었던 파일을 원래 위치로 변경해놓습니다. (cp : copy)

cp /etc/apt/sources.list.bak /etc/apt/sources.list


레퍼런스

https://greensul.tistory.com/280


[Kali Linux] Kali(Debian)에 Snort 설치 방법

Snort 설치 및 구동 방법 - Kali Linux (Debian) 제가 운영 중인 Kali Linux(Debian) VM에 snort 테스트를 하기 위해 snort 설치를 진행하였습니다. Snort는 Network 보안에서 IPS, IDS의 중요한 부분을 차지하고 있습니

greensul.tistory.com


반응형
반응형


https://codingbuza.tistory.com/entry/%EC%9B%B9-3%EA%B3%84%EC%B8%B5-%EC%95%84%ED%82%A4%ED%85%8D%EC%B2%98


웹 3계층 아키텍처 - 기본 구조

여러분이 일상에서 사용하고 있는 인터넷 사이트, 모바일 사이트, 사내 업무 시스템의 대부분이 이 3계층 구조를 채택하고 있다. 사용자 입력을 받고, 그 요청을 각각의 서버가 수용하여 사용자

codingbuza.tistory.com


웹 3계층 아키텍처의 각 서버 간 통신이 이루어진다는 것은 알겠다. 그런데, 어떻게 서버끼리 통신하고, 응답을 사용자 화면에 보여주는 것일까? 또한, 사용자는 웹 브라우저에서 어떻게 그 주소에 접근할까?

서버 간 통신을 보기 전, 간단하게 URL 주소를 IP 주소로 변환하여 검색하는 DNS에 접근하는 방법을 알아보자


0. 웹 브라우저 접근하기


1. Client에서 Web Server 간의 통신

1) 웹 브라우저가 요청

2) URL로 요청한 사이트를 DNS 테이블에서 해석하여 웹페이지 찾기

3) 웹 서버의 프로세스가 요청 접수 완료

4) 웹 서버가 해당 리소스가 정적 콘텐츠인지 동적 콘텐츠인지 판단

5) 필요한 경로로 데이터에 엑세스(단순 이미지, 동영상, 텍스트는 웹 서버에서 / 동적인 건 OS 서버 / 테이블에 접근하는 건 DB 서버)


2. Web Server에서 AP 서버까지

1) 웹 서버로부터 요청 도착. 이때, 요청을 받는 것은 쓰레드

2) 쓰레드가 요청을 받으면 자신이 처리할 수 있는지, 아니면 DB에 접근이 필요한지를 판단

3) DB 접속 필요하면 연결 풀에 엑세스

4) DB에 서버 요청


3. AP 서버에서 DB 서버까지

1) AP 서버로부터의 요청 도착. DB 프로세스가 요청을 접수

2) 프로세스가 요청을 접수하고, 해당 데이터에 대해 캐시가 있는지 확인

3) 캐시에 없으면 디스크에 엑세스

4) 디스크가 데이터를 반환. 이때, 데이터를 캐시 형태로 저장

5) 결과를 APt 서버에 반환


4. AP 서버부터 웹 서버까지

1) DB 서버로부터 데이터 도착

2) 쓰레드가 데이터를 가지고 계산 및 연산 후에 파일 데이터를 생성

3) 결과를 웹 서버로 반환


5. 웹 서버부터 클라이언트 PC까지

1) AP 서버로부터 데이터 도착

2) 프로세스는 받은 데이터를 그대로 반환

3) 결과가 웹 브라우저에 반환되고 화면에 표시


서버간 통신 간단 정리

1) 프로세스나 스레드가 요청을 받는다

2) 도착한 요청을 파악해서 필요에 따라 별도 서버로 요청을 보낸다

3) 도착한 요청에 응답한다


참고서적

https://www.yes24.com/Product/Goods/95800974


그림으로 공부하는 IT 인프라 구조 - 예스24

IT에 종사하는 사람이라면 반드시 읽어야 할 책!IT 인프라 전반에 대한 상식을 그림으로 쉽게 이해한다!이 책에는 다양한 환경에서 저자들이 직접 체득한 인프라 기술의 핵심을 포함해 아키텍처

www.yes24.com


반응형
반응형


여러분이 일상에서 사용하고 있는 인터넷 사이트, 모바일 사이트, 사내 업무 시스템의 대부분이 이 3계층 구조를 채택하고 있다. 사용자 입력을 받고, 그 요청을 각각의 서버가 수용하여 사용자 화면에 띄우게 하는 것이 메인이다. 각 서버의 특징을 알아보고, 3계층 인프라 구조의 장단점을 분석해보자.


웹 서버(Web server)


1. 사용자 입력을 받는다(HTTP 요청)

2. 웹 브라우저에 화면을 표시

3. DB와 관련된 데이터 처리 외에, 프론트단에서 처리할 수 있는 요청을 처리


AP Server


1. 커널 영역을 사용하는 시스템 콜 인터페이스 처리

2. 정적인 요청 해결 (PHP, Java 등)

3. 비즈니스 로직 관리 - 요청되는 정보를 일정 규칙을 통해 관리


DB server


1. 데이터 입출력 담당

2. 효율적 데이터 관리를 통해 응답속도 개선

3. 데이터베이스 접근 관리


3계층 아키텍처의 장단점

장점

1. 서버 부하 집중 개선
- 간단한 요청은 굳이 DB서버까지 접근하지 않아도 웹 서버에서 처리할 수 있다.

2. 클라이언트 단말의 정기 업데이트가 불필요

3. '처리 반환'에 의한 서버 부하 저감

단점

1. 구조가 클라이언트 - 서버 구성 (2계층 아키테처)보다 복잡하다

2. 하나의 서버에 오류 발생시 전체 시스템에 영향을 줄 수 있다


레퍼런스


https://www.stevenjlee.net/2020/05/08/%EC%9D%B4%ED%95%B4%ED%95%98%EA%B8%B0-3%EA%B3%84%EC%B8%B5-%EA%B5%AC%EC%A1%B0-3-tier-architecture/


[이해하기] 3계층 구조 (3 Tier Architecture) | STEVEN J. LEE

3계층 구조 (3 Tier Architecture) 란, 어떤 플랫폼을 3 계층으로 나누어 별도의 논리적/물리적인 장치에 구축 및 운영하는 형태를 말합니다. 예를 들어, 웹 페이지를 운영하는 경우 서버 한대에 모든

www.stevenjlee.net

https://www.yes24.com/Product/Goods/95800974


그림으로 공부하는 IT 인프라 구조 - 예스24

IT에 종사하는 사람이라면 반드시 읽어야 할 책!IT 인프라 전반에 대한 상식을 그림으로 쉽게 이해한다!이 책에는 다양한 환경에서 저자들이 직접 체득한 인프라 기술의 핵심을 포함해 아키텍처

www.yes24.com


반응형
반응형

https://leetcode.com/problems/group-anagrams/


Group Anagrams - LeetCode

Can you solve this real interview question? Group Anagrams - Given an array of strings strs, group the anagrams together. You can return the answer in any order. An Anagram is a word or phrase formed by rearranging the letters of a different word or phrase

leetcode.com

Given an array of strings strs, group the anagrams together. You can return the answer in any order.

An Anagram is a word or phrase formed by rearranging the letters of a different word or phrase, typically using all the original letters exactly once.


Example 1:

Input: strs = ["eat","tea","tan","ate","nat","bat"]
Output: [["bat"],["nat","tan"],["ate","eat","tea"]]


Example 2:

Input: strs = [""]
Output: [[""]]


Example 3:

Input: strs = ["a"]
Output: [["a"]]


Constraints:

  • 1 <= strs.length <= 10^4
  • 0 <= strs[i].length <= 100
  • strs[i] consists of lowercase English letters

풀이방법

입력값(str)의 길이가 10^4이니까, 시간복잡도는 O(n), O(nlogn)정도로 생각했다. 즉, for문 하나에, if문 정도.??

알고리즘이 익숙하지 않은 나에게, 이정도가 최선의 접근이다.


class Solution {
    public List<List<String>> groupAnagrams(String[] strs) {
        Map<String, List<String>> map = new HashMap<>();

        for(String s : strs) {
            // 키를 정렬 후 String 형태로 다시 변환
            char[] chars = s.toCharArray();
            Arrays.sort(chars);
            String key = String.valueOf(chars);

            // 만약 key가 없으면 map key 추가, 있으면 value에 add
            if(!map.containsKey(key)) {
                map.put(key, new ArrayList<>());
            }
            map.get(key).add(s);
        }
        return new ArrayList<>(map.values());
    }
}


반응형

+ Recent posts